
Jul 2024
|
Video Demo
Morpheus Minute: Dashboard
HashiCorp Terraform is a popular Infrastructure as Code (IaC) tool commonly used to provision and manage cloud resources. Terraform can also be used to manage the system configuration of platforms like GitLab, HashiCorp Vault, Artifactory and others. The Morpheus Terraform provider enables Terraform to be used to configure the Morpheus platform using Infrastructure as Code (IaC) practices.
In this blog post you’ll learn how to get started with the Morpheus Terraform provider to manage the configuration of Morpheus using Terraform.
Ensure that you have a recent version of HashiCorp Terraform installed on your system. In this example you’ll create a Morpheus environment using the Terraform provider.
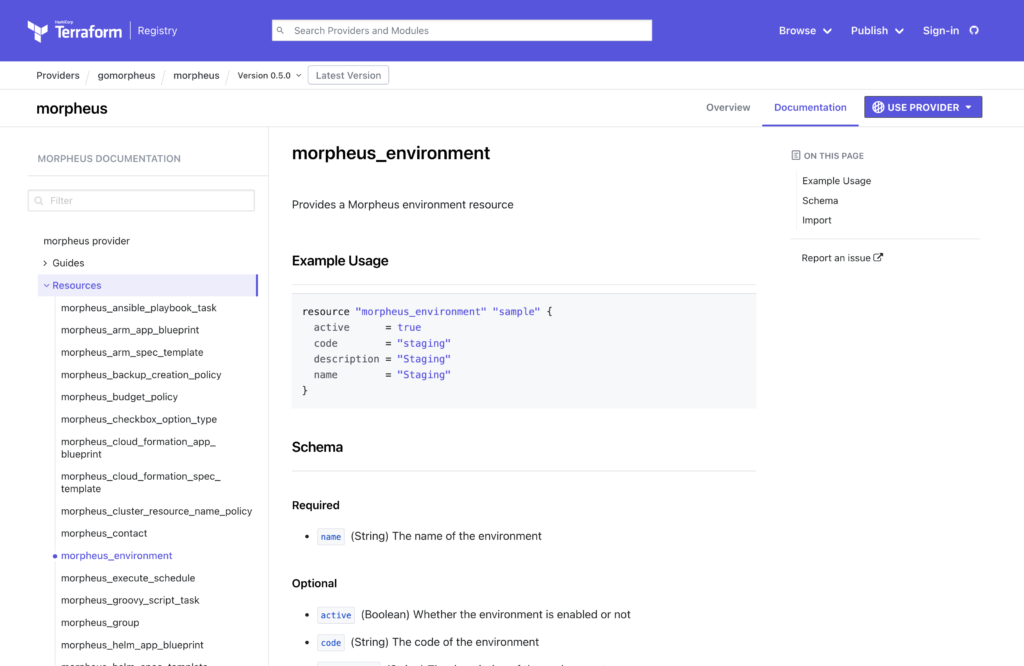
Review the provider documentation for additional details regarding the provider. The Terraform registry hosts the provider documentation. Resource documentation is located under the Resources section.
Create a main.tf file and paste the contents below into the file.
terraform {
required_providers {
morpheus = {
source = "gomorpheus/morpheus"
version = "0.5.0"
}
}
}

provider "morpheus" {}

resource "morpheus_environment" "tfdemo_environment" {
active = true
code = "tfdemo"
description = "Terraform example environment"
name = "TerraformDemo"
}
Define Morpheus credentials
With the main.tf file created you now need to configure the Terraform provider to talk to Morpheus. The provider supports specifying authentication credentials with the username and password or API token.
 export MORPHEUS_API_URL="https://morpheus_appliance_url"
export MORPHEUS_API_USERNAME="admin"
export MORPHEUS_API_PASSWORD="password"
Initialize the directory
Initialize the directory using the terraform init command to initialize the backend and download the Terraform provider.
terraform initThe command should generate output similar to that displayed below.
Initializing the backend...

Initializing provider plugins...
- Finding gomorpheus/morpheus versions matching "0.5.0"...
- Installing gomorpheus/morpheus v0.5.0...
- Installed gomorpheus/morpheus v0.5.0 (self-signed, key ID 7DDA27937C572086)

Partner and community providers are signed by their developers.
If you'd like to know more about provider signing, you can read about it here:
https://www.terraform.io/docs/cli/plugins/signing.html

Terraform has created a lock file .terraform.lock.hcl to record the provider
selections it made above. Include this file in your version control repository
so that Terraform can guarantee to make the same selections by default when
you run "terraform init" in the future.

Terraform has been successfully initialized!

You may now begin working with Terraform. Try running "terraform plan" to see
any changes that are required for your infrastructure. All Terraform commands
should now work.

If you ever set or change modules or backend configuration for Terraform,
rerun this command to reinitialize your working directory. If you forget, other
commands will detect it and remind you to do so if necessary.
Generate a plan
Run the terraform plan command to generate a plan or dry run of the changes.
terraform planThe command should generate output similar to that displayed below.
Terraform used the selected providers to generate the following execution plan.
Resource actions are indicated with the following symbols:
+ create

Terraform will perform the following actions:

# morpheus_environment.tfdemo_environment will be created
+ resource "morpheus_environment" "tfdemo_environment" {
+ active = true
+ code = "tfdemo"
+ description = "Terraform example environment"
+ id = (known after apply)
+ name = "TerraformDemo"
+ visibility = "private"
}

Plan: 1 to add, 0 to change, 0 to destroy.

'''''''''''''''''''''''''''''''''''''''''''''''
Note: You didn't use the -out option to save this plan, so Terraform can't
guarantee to take exactly these actions if you run "terraform apply" now.
Create the Morpheus resource
With the plan run, you’re now ready to perform an apply or create the resource declared in the Terraform code. Run the terraform apply command from the command-line.
terraform apply --auto-approveThe command should generate output similar to that displayed below.
Terraform used the selected providers to generate the following execution plan.
Resource actions are indicated with the following symbols:
+ create

Terraform will perform the following actions:

# morpheus_environment.tfdemo_environment will be created
+ resource "morpheus_environment" "tfdemo_environment" {
+ active = true
+ code = "tfdemo"
+ description = "Terraform example environment"
+ id = (known after apply)
+ name = "TerraformDemo"
+ visibility = "private"
}

Plan: 1 to add, 0 to change, 0 to destroy.
morpheus_environment.tfdemo_environment: Creating...
morpheus_environment.tfdemo_environment: Creation complete after 1s [id=10]

Apply complete! Resources: 1 added, 0 changed, 0 destroyed.
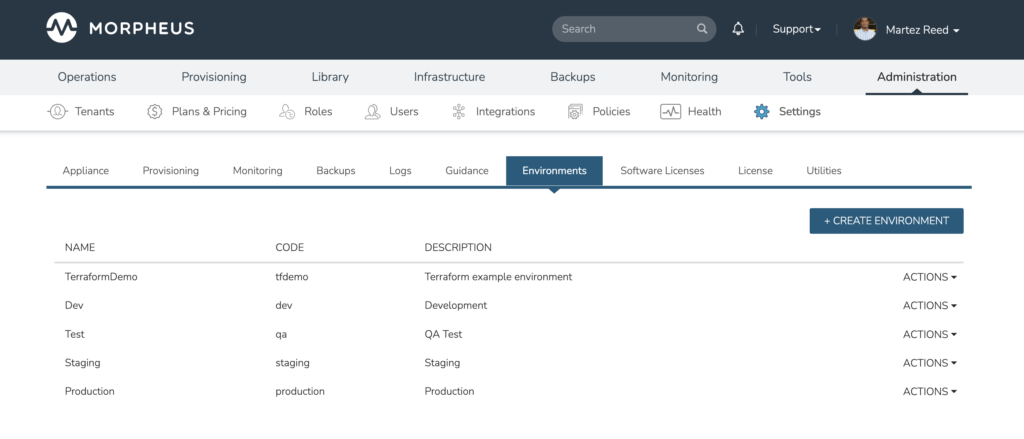
Verify the Morpheus resource
Now you should be able to go into the Morpheus UI and verify that the “TerraformDemo” environment has been successfully created.
The Terraform provider unlocks a number of possibilities for Morpheus administrators to configure and manage the platform utilizing software development practices through the use of Infrastructure as Code with Terraform.
Join the Morpheus community and engage other Morpheus community users to learn more about ways to use the platform. Also, downloading the Morpheus Community Edition lets you fully experience the Morpheus platform including nearly all features and capabilities! Register at Morpheus Hub and try it in your home lab or test environment today!